Monday, August 18, 2014

MuSangChae: Sweet Pickled Radish

무생채


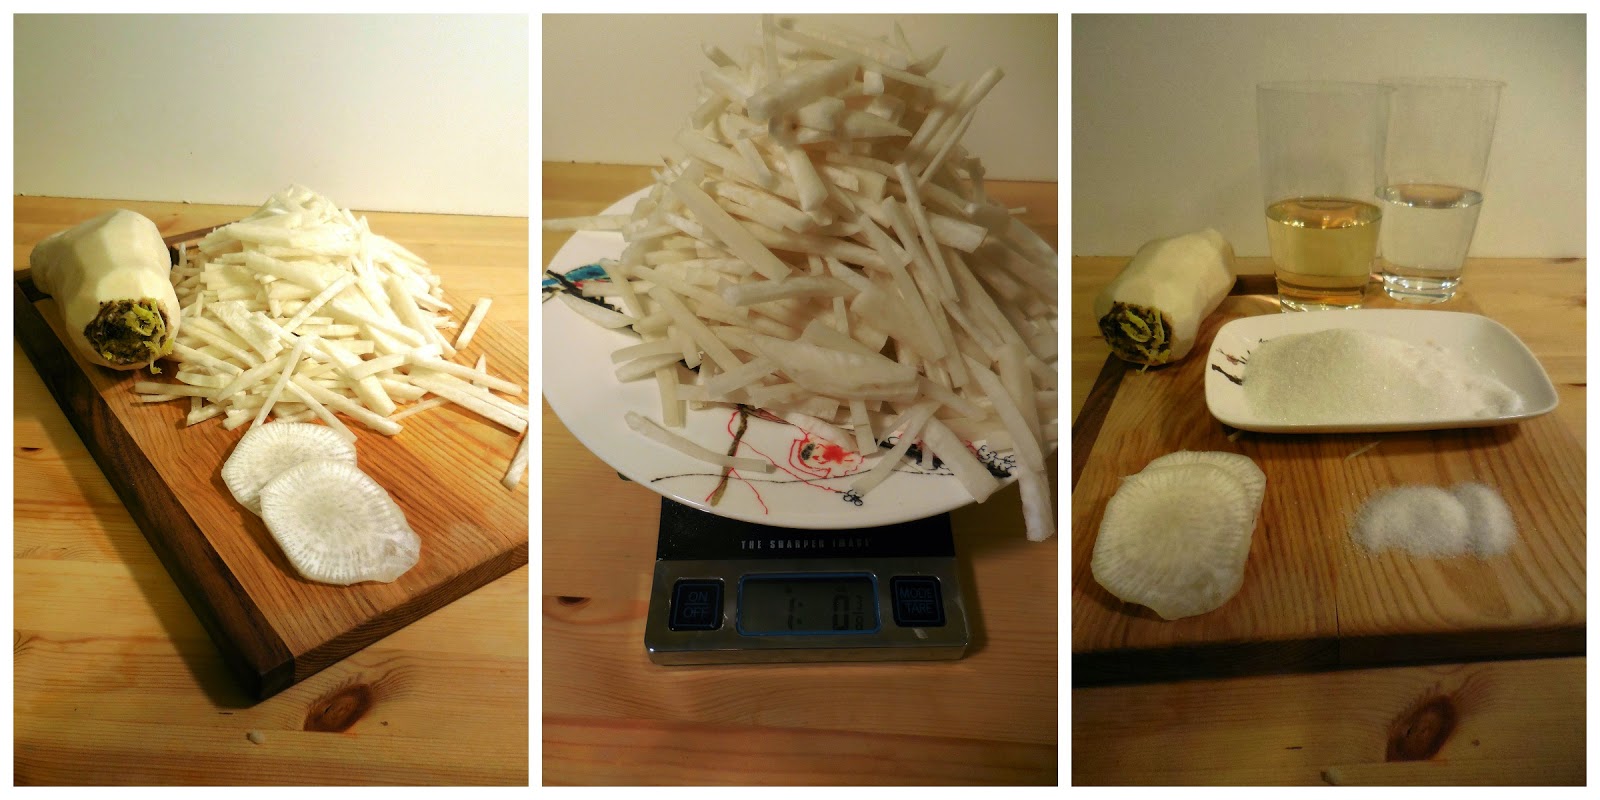
Like I said in my earlier post, I have daikon out the wazoo.  Last night hubby and I put all the daikon to good use and made 5 pounds of (sweet pickled radish)  We both love MuSangChae as a side dish, and it is very rare that we are ever without it.  It is such an easy side dish to make we are always sure our fridge is stocked with it.   MuSangChae has a light crisp sweet flavor, much like a sweet pickle but with the bit of spice that radish adds (and no dill flavor).


Fair warning you either love or hate MuSangChae I have never met anyone that thinks it's just ok.  Also fair warning number two, MuSangChae stinks, you don't really notice it while you are eating it but I have walked into the kitchen a few times while my hubby is eating ramyeon and  MuSangChae and had to open a window because.... it smells a bit like farts >.< so there's that for you.  Just a  fair warning.  I love it and eat it with almost every Korean meal I prepare but it is a bit smelly.
Now that you have had your fair warnings....

Here is what you need...


1 Pound of Daikon Radish Julienned or cut into thin medallions

1 Cup unseasoned Rice Vinegar

1 Cup Water

2 tsp Salt

1 Cup Sugar

Canning jar or sealed glass Tupperware

Here's how you go about doing it...

Wash and Peel the radish and Julienne or cut into thin medallions.  If you don’t know how to Julienne check this video out 


After the daikon is sliced mix the water, rice vinegar salt and sugar in a small bowl.  Be sure to mix well so all the sugar and salt dissolves in the solution. 

Place cut daikon in a canning jar or glass Tupperware. 

Pour pickling solution over daikon, seal jar and refrigerate.

MuSangChae will keep for a month or more refrigerated.  Toss it once the pickling solution starts to turn yellow or brown. 


*Serving Suggestions: MuSangChae really goes with everything.  It is extra good in NangMyeon (cold noodles) and the medallion cut is perfect when eating SamGyupSal (Unseasoned grilled Pork belly)  I will have recipes for both up some time soon so be sure to check back to see how to use your freshly made MuSangChae.

*Additional Notes:  MuSangChae is best eaten 24 hours after making to ensure the radish is seasoned.  However if you are in a rush it is good 2-4 hours after sitting in the fridge as well.
Be sure to use Unseasoned Rice Vinegar, if you buy regular rice vinegar it will already have some salt and maybe sugar in it so your measurements will have to be adjusted accordingly.  Read the ingredients list on the bottle, you only want it to contain rice vinegar and water.   


Kkakdugi: Radish Kimchi

Kkakdugi (깍두기)
Radish Kimchi

Kkakdugi is one of those dishes that I really like making in the summer.  
My folks have a nice sized garden and they grow daikon radish for hubby and me so we can make lots of yummy Korean food in the summer. 


I normally only make kkakdugi in the summer because buying 4 pounds of daikon in the middle of Minnesota in the middle of winter can be quite spendy.  That being said you can cut this recipe in half and still have a nice sized protion of kkakdugi.  
An additional note: I keep my ginger in the freezer because it makes it 100 times easier to grate (which is basically the only way I use ginger)  Feel free to mince it if you are using fresh unfrozen stuff.  It will be easier for you, but honestly try freezing your ginger it is the best thing ever!
Now that I am done ranting about ginger....here's what you will need for your very own Radish Kimchi!


Ingredients:
4 pounds of daikon radish (peeled and cubed)
2 TBSP salt
¼ cup sugar
6 cloves of minced garlic
½ inch grated ginger (1tsp minced ginger)
4 spring onions chopped
¼ cup fish sauce
2/3 cup hot pepper flakes
1/3 cup reserved radish juice
Glass containers for canning


Instructions:


Peel and slice the 4 Ib of radish, be sure to slice the radish at least 1-1 ¼ in thick.  Cube the radish by slicing in thirds going both directions for larger pieces and slicing by halves for thinner pieces. (the radish will shrink after adding salt and after fermenting)

Place sliced radish in a large bowl and mix with 2 TBSP of salt and ¼ cup of sugar.  Let the radish sit at room temperature for 2 hours.  At the end of 2 hours you should see radish juice in the bottom of the bowl.  Drain the radish and reserve at least 1/3 cup of the juice.


Place the radish in a large mixing bowl and add in minced garlic, ginger, spring onions, fish sauce hot pepper flakes, and reserved radish juice. 


Mix well with your hands.  You will want to wear gloves to protect your hands from staining and being burnt by the hot pepper.  


mix kkakdugi until a paste forms like this.  see how the radish has yellowed...

Mix until all the ingredients have formed a paste and the radish looks more yellow/red instead of white.


Place kkakdugi in glass containers and firmly push it down with your hand.  You want to try and remove as much air and space between the radish cubes as possible.  I have used canning jars in the past as well as glass pyrex containers.  If using a container with a lid you don’t want stained place some plastic wrap over the mouth of the jar or container before closing to prevent stains.

Fresh Kkakdugi, tightly packed and no air bubbles!

Let the containers sit on your counter for 24-48 hours.  Once you see bubbles rising to the top of the jar it is time to put it in the refrigerator.  If you don’t see bubbles rising up on their own after 24 hours try tapping the side of the jar.  If you see bubbles then put it in the refrigerator.  If you don’t see bubbles let the kkakdugi sit out longer.


You can eat the kkakdugi right away but it is best to let it ferment for 24 hours and then sit in the fridge for a day or two to really develop the flavors.


*Serving Suggestions: kkakdugi is great with everything.  When the hubby and I run out of kimchi we will eat kkakdugi instead.  It is particularly good with gamjatang a potato and pork stew that I will have a recipe for next week.  Enjoy!


Monday, August 11, 2014

Dolset Bi Bim bap


Dolset BibimBap (돌솥 비빔밥)
Mixed rice and vegetables in a hot stone bowl (Serving size 2)


When I lived in Korea there was a great BibimBap restaurant a few blocks away from my school.  My hubby and I would meet there once a week for lunch.  They had so many varieties of bibimbap I loved trying new dishes each time we went there.  This recipe is for a traditional bibimbap but really you can put anything on top.  Bibimbap literally translates to mixed rice so your options really are endless, you can mix anything in you want.  


Here's what you will need for a traditional Dolset Bimbap:

Toppings
  • ¼ to ½ Ib of marinated beef (I used beef stew meat, but have used ground beef in the past as well as other cuts of beef made bite size)
  • ½-1 zucchini julienned (sliced into thin strips)
  • ½-1 carrot julienned (sliced into thin strips)
  • 3 dehydrated shiitake mushrooms (rehydrate or use fresh)
  •  Sigeumchi Namul (spinach salad) go here for the recipe
  • Vegetable Oil to coat  1-3 tsp of oil to coat pan
  • 3 pinches of salt


Yang Nyum Jang: Spicy Topping Sauce:
  • 2 TBSP gochujang
  • 1 TBSP honey
  • 1 TBSP sesame oil
  • 1 ½ tsp rice vinegar (or apple cider vinegar)
  • 1 TBSP roasted sesame seeds
  • 1 tsp minced garlic (optional)


Marinade: For 1Ib of beef (the leftovers can be used for a side dish later on)
  • ½ cup soy sauce
  • ½ cup reduced sodium soy sauce (you can use 1 cup of soy sauce but I feel it makes the dish too salty)
  • 2 ½ TBSP
  • 4 cloves of garlic crushed
  • 2 TBSP toasted sesame seeds
  • ¼ cup + 1 TBSP sugar
  • Marinade the beef for 1 hour or overnight.  If you want to store it for later use just pour the mixture into a freezer safe bag or container and freezer for later. 
  •  

Instructions:

Cook 2-3 portions of rice

Bring a medium sized skillet to medium heat and coat with oil.  Cook ¼- ½ Ib beef till it reaches your desired temp level.  I like to cook min to medium rare or medium. Remove beef from pan and set aside.  Wipe pan with paper towel and re-coat with oil.


Add zucchini to pan and add a pinch of salt cook until zucchini is slightly soft 1-3 minutes. Remove and set aside.


Add carrot to pan and add a pinch of salt and cook until soft 1-4 minutes. Remove and set aside.   Let sit for 1-2 minutes before slicing into 1 inch slices. Wipe pan with paper towel and re-coat with oil.


Add sliced mushrooms to pan and add a sprinkle of salt.  Cook until soft 1-5 minutes.  Remove and set aside. 


Mix all the spicy sauce ingredients together.

Fry two eggs sunny side up.


Construction:
If you have a dolset heat it over an open flame or heat your oven to 350 and put it in your oven while it warms up.  (if you don’t have a dolset just use a medium to large sized bowl)
Lightly coat the bottom of the dolset with sesame oil.  Add rice (you should hear a sizzling sound)
Top rice with vegetables and meat, starting with the meat, next to the meat place some zucchini then mushrooms, carrots and spinach salad.  In the center of the bowl place your fried egg.  Drizzle with your spicy sauce and keep a small bowl on the table to add extra spice to your dish as desired. 

*Serving Suggestions: My favorite way to eat this dish is with kimchi and a cold glass of sprite.  If you want to try something extra fun add a bit of shredded mozzarella cheese to the mix of toppings.  


Sunday, August 10, 2014

Gyeran malri : Egg role side dish


The Gaeran role is one of my go to side dishes because it is so quick and easy to make.  When I am at a loss of what to make for dinner I will whip one of these up, some rice and kimchi and some pan fried zucchini really hit the spot.  The best thing about this side dish is that it is good hot or cold so you can eat it a day after preparing it, or bring it for lunch the next day if you have leftovers (hubby and I never have leftovers)

You will need:


  • 3 eggs
  • 1 spring onion finely chopped
  • 2 baby carrots or ¼- ½ a carrot finely chopped
  • Salt to taste
  • 1-3 tsp of oil to coat pan
Here's how to put the whole thing together:


Mix eggs chopped onions and carrots in a bowl.


Heat a small 8-10in frying pan on medium heat and grease with oil. Use a paper towel to soak up any excess oil.


Pour 1/3rd of the mixture into the pan and swirl so it evenly coats the bottom of the pan.


When the egg is mostly cooked through start to role it up using chopsticks or a spatula.


 Move the egg role to one side of the pan and pour in the next 1/3 of the mixture.  Be sure the mixture connects with your egg role on the side of the pan.

When the egg is mostly cooked again and role the new mixture around the small role.

Finish off with your last 1/3 of mixture and role again.

Let sit for 1-2 minutes before slicing into 1 inch slices.


*Serving Suggestions: this dish is good hot or cold and the perfect side dish to almost any meal.